Measurements: 100 cm x 114 cm
Number of Hexagon flowers: 16 each made up of 7 hexagons
Number of outline Hexagons: 168
Number of half Hexagons: 16
Edging: Crab stitch
Yarn used: Cygnet Acrylic double knit
Hook: 4mm

TUTORIAL
Joining the hexagons to make the flower motifs is relatively easy - but it may be better to plan your design on hexagon paper so that you can see which hexagons to attach to which when doing all the outline hexagons.
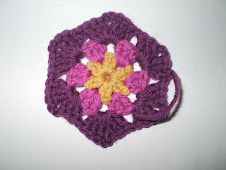
A quick refresher of the hexagon motif (tutorial in my side bar)
Chain 5 join with slip stitch
1st row: 3 ch, 11 tr into ring and join with slip stitch (12 stitches)
2nd Row: 3 ch, 2 tr into same space, *1 ch skip a space and make 3 tr in next space. Repeat from * 4 times more and join to top of beginning 3ch with a slip stitch (6 groups of 3 trebles)
3rd Row: 3 ch, 2 tr, 2ch, 3 tr in same chain space, *1 ch then 3 tr, 2 ch, 3 tr in next space. Repeat from * four more times and join to top of beginning 3 ch with a slip stitch (6 groups in all).Fasten off.
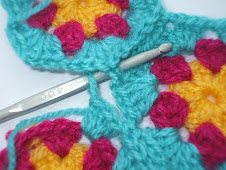
Below I have already joined two hexagons together, and I will show you how to join in a third

First of all you need to make another hexagon and when you get to the last round make your first hexagon point as usual then chain one and make the first 3 tr of the second group

then instead of doing the 1ch, make 1dc but through the 2ch space of a corner of the hexagon you are going to join it to, then twist the hook back and do your normal 3tr back in the previous space to complete the corner on the first hexagon.

then instead of doining the 1ch, make another dc through the 1ch space between corners and then twist the hook back and do 3tr for the start of the next corner. Again, instead of your 2ch make a dec into the corner of the hexagon you are joining to

Can you see where I am coming from? I do hope so, I really do - I promise you it is quite easy!!

Carry on with this technique and once you reach the end of where the hexagons touch carry on the rest of the round as normal.


Can you see where I am coming from? I do hope so, I really do - I promise you it is quite easy!!

Carry on with this technique and once you reach the end of where the hexagons touch carry on the rest of the round as normal.

I hope this is a bit clearer than mud!!
I hope you have fun with this my lovely Blogettes and pleeeeaaase let me see the results so I know this tutorial has been worthwhile!! I will try to do a tutorial on the half hexagon - but to be honest I will have to make one to remember how I did it - I think it was a bit "hit and miss"
I hope you all have a happy hooky weekend
Speak soon xx


Oh so happy... thank you so much for doing this tutorial, I know it had to be an awful lot of work. Now all I need to do is find time to do this!
ReplyDeleteHugs - Sandy
Hi Kim!
ReplyDeleteYou'll make a lot of Crochet-Blogettes very happy with your tutorial!
Thank you!
~X~ Karin
Gosh I'm impressed! You have been working hard. I've been worried about you, you've been so quiet this week, but I am sure it has taken you simply ages to do this Kim.
ReplyDeleteMany thanks to you from all your Blogettes!
Just so fantastic!
Hugs and have a great weekend, Love Suex
Thanks for posting this Kim, I think this might be my next project. Thanks for your lovely comments and getting back to me. I too use acrylic yarn, cheap, cheerful and washes beautifully. I thought you must be using some fearfully expensive stuff to achieve such lovely work. Hope you have a great weekend.
ReplyDeleteJak x
Oh I get it now !! I have been trying to figure out the join as you go thing, and now it has all become clear. Can't think why I couldn't do it before now, funny how the penny drops isn't it?
ReplyDeleteLouise xx
Perfect. Just what I'm looking for as I start my African Flowers. I'm bookmarking this page for sure. I know I will be back, as you have made this sooooooooo much easier looking.
ReplyDeleteHope you are having a wonderful weekend,
Kate
Your tutorial is fabulous! Thank you, I am going to start making mini's soon!
ReplyDelete♥
Hola, me llamo Manoli, me ha encantado tu blog y lo bien que explicas lo de los hexágono, yo te invito aque entres en el mio.
ReplyDelete